May 13, 2026
Espresso Shot Quality: Pulling, Reading the Crema, Common Mistakes
Some links in this guide are affiliate links. If you buy through them, Pulled may earn a commission at no extra cost to you. Our recommendations are based on editorial judgment and coffee culture knowledge, not commission rates.
Pulling a quality espresso shot is a small daily exercise in numbers and observation. The recipe is fixed: 18 grams of finely ground coffee in, 36 grams of espresso out, 25 to 30 seconds of contact time at 9 bars of pressure and 93 degrees Celsius. Shots that hit the numbers and the timing land in balance; shots that miss the numbers fail in predictable ways with predictable fixes. This post walks through the canonical shot, the technique behind it, the crema as a diagnostic, the common failure modes, and the dial in protocol that turns a new bag into consistent espresso. Internal link to The Espresso Machine Buying Guide for the gear architecture underneath this technique.
The short version of the technique. Dose 18 grams of fresh whole bean coffee, grind fine, distribute with a needle tool, tamp level with consistent pressure, lock the portafilter into the group head, start the shot and the timer together, watch the stream, stop the shot at 36 grams of liquid out (around 25 to 30 seconds), and drink within two minutes. Each step has a margin of acceptable variation; the cup quality is the cumulative result of how tightly the brewer hits each one.
The four numbers that define a shot
Espresso is a method built on four numerical targets. A drinker pulling shots that hit all four lands in the cafe-quality band. A drinker missing any one of the four produces a noticeably weaker cup.
Dose: 18 grams of dry coffee. Standard double-shot portafilter baskets are designed for 18 to 21 grams. The dose determines the bed thickness and the resistance to water flow. A 16 gram dose under-fills the basket and channels easily; a 22 gram dose over-fills and chokes the shot. 18 grams is the working middle.
Yield: 36 grams of espresso out. The 1:2 ratio (dose to yield) is the standard espresso recipe. A 36 gram pour balances strength and extraction. Yields lower than 32 grams produce ristretto-style shots (concentrated, sweeter, less extraction); yields above 40 grams produce lungo-style shots (longer, more diluted, more bitter compounds). The 1:2 ratio is what most third wave cafes target by default.
Time: 25 to 30 seconds. The shot timing runs from the moment the pump starts to the moment the brewer cuts the shot at the target weight. The first drops appear at 7 to 10 seconds; the main flow runs from 10 to 25 seconds; the final drops fall between 25 and 30 seconds. Faster than 22 seconds means the grind is too coarse; slower than 32 seconds means the grind is too fine.
Temperature: 93 degrees Celsius. Brew water temperature target. Cafes use PID-controlled boilers to hold this within 0.5 degrees. Home machines vary; entry-level thermoblocks swing 3 to 6 degrees. The temperature affects the extraction balance: hotter water pulls more bitter compounds, cooler water pulls more sour compounds. Most home machines run slightly cool on the first shot and warmer on subsequent shots.
The workflow, step by step
The shot workflow takes 60 to 90 seconds from grind to pour at a working pace. The steps are sequential and each one matters.
Preparation (before the shot): Turn the machine on 20 to 30 minutes before pulling. Run a blank shot through the empty portafilter to warm the group head. Preheat the cup with hot water from the brew head. Wipe the steam wand and the group seal.
Grind: Set the grinder to the fine espresso setting. Place the portafilter on the grinder dose cup or directly under the grind chute. Grind 18 grams (weigh on a 0.1g scale). The grind should look uniform and feel fine between two fingers, finer than table salt, not quite powder.
Distribute: The grind falls into the basket unevenly. Use a WDT tool (a row of fine acupuncture-style needles) to stir the bed gently for 5 to 10 seconds, breaking up clumps and distributing the grounds evenly. Tap the portafilter on the counter once to settle the bed.
Tamp: Place the portafilter on a flat surface. Press the tamp straight down into the bed with about 30 pounds of pressure (firm handshake strength). The surface of the puck should be level. A tilted tamp creates channeling on the high side.
Pull: Lock the portafilter into the group head with a firm but not violent twist. Place the 0.1g scale and pre-heated cup under the spout. Start the shot and the timer simultaneously. Watch the stream.
Observe: The first drops appear at 7 to 10 seconds. The main flow starts as light brown and gradually lightens to honey-colored as the shot progresses. The stream should be even from both spouts of the portafilter; light yellow streaks or sprays indicate channeling.
Stop: Cut the shot the moment the scale hits 36 grams. Note the total time. The shot is done.
Drink: Espresso loses character fast as it cools. Drink within two minutes. Swirl the cup once before sipping to integrate the crema with the brew underneath.
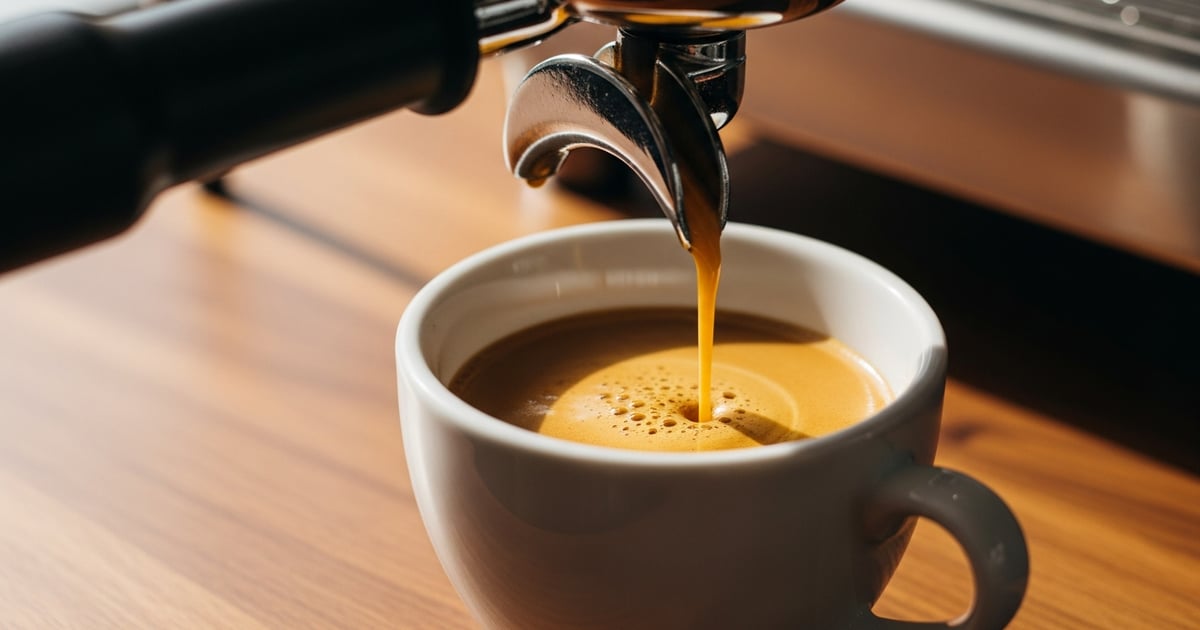
Reading the crema
The crema is the foam layer that sits on top of the shot. It is composed of CO2 from the bean, dissolved oils, and emulsified solids. Reading the crema gives the brewer real-time feedback on the shot quality before the first sip. Four crema signals matter.
Color: A healthy crema is a uniform medium brown with the color of caramel or hazelnut. The shade varies by bean roast level (lighter roasts produce lighter crema; darker roasts produce darker crema), but the color should be even across the surface. Pale or thin crema indicates stale beans or under-extracted shots. Dark, almost black crema indicates over-extraction or beans that are too dark.
Thickness: A good crema has a visible body, 3 to 5 millimeters thick on a fresh pull. The crema should persist for 60 to 90 seconds before breaking. Robusta blends (Lavazza Super Crema, Italian tradition espressos) produce thicker, longer-lasting crema due to the higher protein content. Pure Arabica blends produce thinner crema that breaks faster, which is the species’ natural behavior.
Texture: The crema surface should look like reptile skin or velvet, with fine bubbles uniformly distributed. Large bubbles, gaps, or oily slicks indicate problems. Large bubbles often mean stale beans (the gas was lost during off gassing before the shot pulled); oily slicks mean the bean has past its prime window and the oils are migrating to the surface.
Tiger striping: Some shots produce a striped pattern in the crema, darker and lighter bands that look like tiger fur. Tiger striping is a sign of even extraction and a properly distributed puck; the stripes form because lighter and darker fractions of the bean extract at slightly different rates and stratify in the crema. Tiger striping is a good visual signal even when the shot is not technically perfect on the numbers.
Common failure modes and their fixes
Most home espresso fails for a small number of recurring reasons. Diagnose what the shot looks like, then adjust one variable.
The shot ran too fast (under 22 seconds, light streams). The grind is too coarse. Tighten the grinder one click and pull again. If the shot still runs fast, raise the dose by 0.5 grams. Channels are the second cause; if the stream is uneven or has light spots, the puck was not distributed evenly before the tamp.
The shot ran too slow (over 35 seconds, heavy stream). The grind is too fine. Coarsen one click. If still slow, lower the dose by 0.5 grams. A choked shot (water barely passes through the puck) indicates a grind multiple clicks too fine; coarsen more aggressively. Old coffee (more than four weeks past roast) also stalls because the bean has dried and packed tighter.
The shot tastes sour. Under-extracted. The grind is too coarse, the water is too cool, or the shot was pulled in under 22 seconds. Tighten the grind and re-pull. If the shot is in time and still sour, raise the boiler temperature by 1 to 2 degrees; some lighter roasts want 95 to 96 degrees rather than 93.
The shot tastes bitter or harsh. Over-extracted. The grind is too fine, the shot ran past 32 seconds, or the water is too hot. Coarsen the grind one click. If the time is correct and the shot still tastes harsh, drop the boiler temperature by 1 degree.
The shot has no crema. Either the coffee is stale (past 4 weeks off roast, or freshly ground), the pressure is wrong, or the grind is too coarse. Crema is a function of CO2 in the bean, dissolved into the brew at high pressure. Use coffee within 4 weeks of the roast date. If freshness is correct and the puck looks even, check the OPV setting; pressures above 11 bars produce thin, fast crema that collapses.
Channeling (uneven stream, light streaks). The water found a path through the puck that bypassed most of the coffee. Channels develop when the bed is uneven, has gaps, or has voids near the basket edges. The fix is the WDT distribution step before tamping and a level tamp afterward. Most home channeling can be eliminated by adding the WDT step alone.
The shot pours out one side only. The basket or the portafilter has a clogged hole on one side. Remove the basket and clean it thoroughly; coffee oils accumulate in the basket holes and can blockage. Replace the basket if cleaning does not restore even flow.
The dial in protocol
A new bag of espresso beans always pulls differently from the last bag. The grind setting that worked on the last bag will not work on this one. The drinker has to dial in: adjust the grinder, weigh the dose, time the pull, and taste the shot in a controlled sequence until the cup is in balance. Done well, dialing in takes 3 to 5 shots and roughly 100 grams of coffee.
The standard protocol runs as follows. Pull the first shot at the last bag’s grinder setting. Note the time and the taste. Adjust one click finer or coarser based on the result (faster than 22 seconds: finer; slower than 32 seconds: coarser; sour: finer; bitter: coarser). Pull the second shot at the new setting. Repeat until the shot lands in the 25 to 30 second window and tastes balanced.
Two specific failure modes to watch during dial in. The first is "settled in" beans: a bag pulled the day it arrives often runs differently from the same bag pulled four days later. Coffee continues to off-gas for 4 to 7 days after roasting. The fix is to rest a new bag for 4 days before starting the dial in.
The second is mid-bag drift: the same setting that worked for the first week often runs slightly differently in the second and third weeks as the beans age. The fix is to re-dial every 3 to 5 days for the duration of the bag, with smaller adjustments than the initial dial in required.
The water dose variation
Some recipes adjust the ratio (1:1.5 for ristretto, 1:3 for lungo) rather than the 1:2 standard. The ratio affects the cup’s strength and extraction balance.
Ristretto (1:1.5): 18 grams in, 27 grams out. The shot is sweeter, more concentrated, and has less of the bitter compounds that develop in the second half of a pull. Cuts the shot short before the later, harsher fractions come through. Common in Italian tradition espresso bars.
Normale (1:2): 18 grams in, 36 grams out. The standard third wave shot. Balanced between sweet front and bitter finish. Default for most home recipes and most third wave cafes.
Lungo (1:3): 18 grams in, 54 grams out. The shot is longer and pulls more of the bitter compounds, producing a more aggressively flavored cup. The Italian "caffè lungo" tradition uses this ratio for a stronger, less concentrated drink.
For most home setups, the 1:2 normale is the right starting point. After 4 to 6 weeks of consistent normale shots, the brewer can experiment with ristretto or lungo to taste the difference. Each ratio has its merits depending on the bean and the drink (ristretto for milk drinks where the sweetness compensates for the dilution; lungo for drinkers who prefer a stronger black cup).
The preinfusion question
Preinfusion is the practice of running water through the puck at low pressure (1 to 2 bars) for 5 to 15 seconds before the full 9-bar shot begins. The slow start saturates the bed evenly and gives the grounds time to swell before the main pressure hits, which reduces channeling and improves extraction balance.
Most espresso machines above $1,000 include programmable preinfusion. Cheaper machines either have a fixed preinfusion built into the shot cycle or no preinfusion at all. For machines without preinfusion, the brewer can manually simulate it by flipping the brew switch on for 5 seconds, off for 5 seconds, then on for the full shot. The technique is awkward but effective for older or entry-level machines.
Preinfusion benefits lighter-roasted, denser beans more than darker, softer beans. A washed Ethiopian or a Kenyan SL28 will show measurable improvement from 8 to 10 seconds of preinfusion. A medium-dark Brazilian blend will show smaller benefits; the bean is softer and saturates evenly without the extra step.
Reading the puck after the shot
The spent puck (the disc of coffee that remains in the basket after the shot) contains diagnostic information about the pull. Three signals to check before knocking the puck out.
Wet puck: A puck that is uniformly wet without standing water is healthy. Standing water on top of the puck (a quarter inch or more) indicates a stalled shot or a choked grind. The water that did not pass through is the water that did not extract.
Cracks or holes: A puck with visible cracks or pinholes is showing where channeling occurred during the shot. The water found the cracks and bypassed the bed around them. The fix is better distribution before the next shot.
Even brown coloration: A puck that is uniformly mid-brown across the surface had even extraction. Lighter patches indicate under-extraction; very dark spots indicate over-extraction or channeling. Most healthy pucks are nearly uniform with minor color variation.
Some brewers tap the spent puck out of the portafilter directly into the knock box, others wipe the basket clean with a microfiber cloth before the next shot. Both approaches work. The basket and portafilter should be wiped dry every 3 to 5 shots to prevent the buildup of old coffee residue that contaminates future pulls.
The pre-flight machine check
Before the first shot of the day, a 60-second check eliminates the most common issues. The machine has been off overnight; the boiler is cold or warm but not at brew temperature; the group head is empty and the previous day’s grounds may have dried in the basket. Working through the check in order saves the first shot from being a throwaway.
Turn the machine on 20 to 30 minutes before pulling. Most home machines need this long to reach stable temperature throughout the brewing path. Run a "blank" shot through the empty portafilter (no coffee) to flush the group head with hot water and clear any stale water from the boiler line. Wipe the steam wand and purge it for 2 seconds.
Preheat the cup. Pour hot water from the brew head into the cup, swirl, and dump. The cup is now warm; the shot will not cool 5 to 10 degrees when poured into a cold cup. The temperature stability across the first sip improves measurably with the preheat step.
Check the grinder. The grind setting from yesterday is the starting point but the bean has aged 24 hours; the same setting may pull slightly differently. The first shot of the day is often the dial in shot; expect to adjust the grinder one click finer or coarser based on the result.
The flow profiling era
Recent espresso machines (Decent DE1, Slayer, La Marzocco Strada) offer "flow profiling": the ability to adjust the pump pressure throughout the shot rather than holding it at 9 bars for the entire pull. The technique allows the brewer to start at 3 bars (low pressure preinfusion), ramp to 9 bars during the main extraction, and decline to 5 bars during the tail.
Flow profiling produces measurable cup quality improvements for lighter-roasted, denser beans. The slow start saturates the bed without channeling; the high-pressure middle extracts efficiently; the declining tail avoids pulling the harshest compounds. A Decent DE1 owner with the right profile can extract a washed Ethiopian at 25 percent extraction yield (the SCA upper bound), which is hard to reach on fixed-pressure machines.
Home flow profiling is available at two price points. The Decent DE1 ($3,000 to $4,500) is the most accessible flow-profiling machine. The La Marzocco Linea Mini ($6,500) with the Pro Touch upgrade adds basic flow control. Below $3,000, home espresso machines run fixed 9-bar pressure and the brewer cannot manipulate the pressure curve. Most home setups do not need flow profiling; the technique is a small improvement on top of an already-dialed setup.
Building the milk drink
Most home espresso pulls end in a milk drink rather than a straight shot. The milk component requires its own technique that interacts with the espresso quality.
Steam the milk in a stainless pitcher with the wand tip just below the surface, creating a vortex that incorporates air into the milk for the first 3 to 5 seconds (the "stretch" phase). Submerge the tip deeper to heat the milk without further aeration. Target 60 to 65 degrees Celsius for whole milk, slightly lower for oat milk (around 55 to 60 degrees). The microfoam should look like wet paint and pour smoothly without large bubbles.
Pour the milk into the espresso from a height of 4 to 6 inches at first to integrate the brew, then drop closer to the cup as the cup fills to allow the foam to float on top. Latte art is built in the final inch of pour; the design comes from the angle, the height, and the speed of the pour. The technique takes weeks of practice to develop; the underlying milk quality (microfoam, temperature, pour consistency) is what makes the art possible.
Long term consistency: the maintenance schedule
Espresso quality degrades over time without active maintenance. Three habits keep home machines pulling consistently.
Daily backflush with water. After the last shot of the day, lock a blind basket into the portafilter and run the brew cycle for 10 seconds. This forces water backward through the three-way solenoid valve and clears the brewing path. Daily backflush prevents the slow buildup of coffee oils in the group head.
Weekly backflush with detergent. Once a week, repeat the backflush with a teaspoon of Cafiza or Urnex cleaning detergent in the blind basket. Run the brew cycle for 10 seconds, wait 10 seconds, repeat 4 to 5 times. Then run a plain water backflush twice to rinse. The detergent strips the oils that water alone cannot remove.
Monthly descale. Run a citric acid or commercial descaling solution through the machine’s boiler once a month, or every two months if the water is soft. The descale removes mineral buildup that insulates the heating element and gradually slows the machine.
The maintenance schedule takes 15 to 30 minutes per week and extends the working life of the machine by years. A neglected machine produces measurably worse shots within 6 months; a maintained machine pulls the same quality at year 8 as at year 1.
The competition-shot context
The World Barista Championship (founded 2000) sets the technical bar for espresso brewing. Competitors pull three "signature beverages" plus four espresso shots plus four milk drinks across a 15-minute set. The shots are judged on temperature, color, crema, flavor balance, and adherence to the competitor’s stated recipe. The 2023 and 2024 winners (both from Asia: Boram Um Coffee in Korea, then Mikael Jasin in Indonesia) pulled shots with very specific recipes: 21 grams in, 42 grams out, 26 seconds at 94 degrees, using carefully sourced and hand-prepared beans.
The competition recipes are not directly transferable to home setups because the gear is different (commercial grade machines and grinders the competitors use cost $20,000+). But the principles transfer. The competition shots are built on the same four numbers as home shots, with the same workflow steps, with the same crema diagnostics. A home brewer who reaches consistent 25 to 30 second pulls at 1:2 ratio is doing the same fundamental work as the competition winners, at a lower ceiling.
The competition footage is freely available on YouTube and worth watching for technique reference. The competitors’ distribution patterns (the WDT motion, the leveling, the tamp pressure) are visible in slow motion. A home brewer studying competition footage for 30 minutes picks up small technique improvements that compound across hundreds of subsequent home shots.
The basket choice
Espresso baskets come in three categories: pressurized (for preground coffee, used in entry-level machines), single-wall standard (for whole bean home espresso), and precision baskets (machined to tighter tolerances, used in third wave cafes). The basket choice affects shot consistency more than most home drinkers realize.
Pressurized baskets are the default in machines under $300 (cheap Mr. Coffee and Cuisinart espresso makers). The basket has a single small hole that simulates pressure. The result is a passable shot that does not respond meaningfully to grind or dose changes; the basket masks the brewing problem rather than producing real extraction.
Single-wall standard baskets are the default in machines $400 to $1,500 (Breville Bambino, Lelit Anna, Profitec Pro 300). The basket has hundreds of small holes that depend on a real espresso puck to produce pressure. The shot responds to grind, dose, and tamp variations as real espresso should.
Precision baskets (IMS, VST, or factory-OEM equivalents) are machined to tighter tolerances than standard baskets. The holes are more uniform in size and distribution, which produces more even extraction. The upgrade from a standard basket to a precision basket is a $30 to $80 investment that closes a measurable portion of the home-versus-cafe gap.
The bean as the upstream variable
Even with perfect technique and a clean machine, the bean limits the shot. A stale bag produces stale shots; an over-roasted bag produces over-roasted shots; a wrong-roast bag for the brewing context produces an off cup. Three quick bean checks before assuming the technique is the problem.
Roast date: within 4 to 28 days of opening, ideally within the 7 to 21 day window. A bag past 4 weeks should be replaced before troubleshooting other variables.
Roast level: espresso-roast (medium to medium-dark for most third wave bags, dark for Italian tradition). A filter-roasted bean (very light) often does not produce the body and crema that espresso requires.
Bean condition: the beans should look uniformly colored, neither oily nor patchy. Very oily beans (slicked surfaces) indicate the bag is past its prime; very dry, brittle beans indicate over-roasting or stale storage.
Practical takeaway
A quality espresso shot is built on four numbers (18 in, 36 out, 25 to 30 seconds, 93 degrees) and one workflow (grind, distribute, tamp, pull, observe, stop, drink). The shots that fail miss one of those numbers and the diagnostic is the crema, the stream, and the taste. Within two to four weeks of daily practice, a drinker who weighs the dose, distributes the bed, and tracks the timing reaches reliable cafe-quality shots from a home setup.
The hardest part is consistency. The same recipe pulled across 30 mornings produces 30 shots that vary based on small variables (room temperature, bean age, the brewer’s attention that morning). The discipline that turns occasional good shots into reliable good shots is the dose scale, the grinder, and the timer used on every pull without exception.
Pulled exists so the cafe pouring the reference espresso is findable from any city, and the home setup is what brings that shot quality into the kitchen on the mornings the cafe is not an option. The pillar guide on The Espresso Machine Buying Guide covers the deep architecture; this post slots in as the technique-level guide that turns the gear into a working morning shot.
Our Picks
What we'd buy on Amazon for this
Normcore · WDT Distribution Tool
Breaks up clumps in the basket. Two minutes saved per shot, no channeling.
$19.99
View on Amazon →Bodum · Pavina Double-Wall Glasses (Set of 6, 12oz)
The cafe glass for serving iced lattes, iced Americanos, and cold brew at home.
$40.99
View on Amazon →Breville · Bambino Plus Espresso Machine
A reasonable entry point at $300 less than the Barista Pro.
$488
View on Amazon →


Pulled may earn a commission on purchases. Cookie applies to all Amazon items in your next 24 hours, not just this product.
See all Pulled Picks →Keep going with Pulled